
Rubber Ducky Isopod Care Guide: Setup, Breeding, Diet & Everything I’ve Learned After Years of Culturing Them (2026)
The first time I saw a rubber ducky isopod in person, I laughed out loud. I’d been keeping and breeding isopods for years—dairy cows, powder oranges, zebras, the classics—but nothing prepared me for a tiny crustacean that genuinely looks like a rubber duck. That bright yellow face, the little dark “eyes,” the rounded body segments that somehow mimic a bath toy’s proportions. I was holding a sealed container with about ten of them, and I remember thinking, These are either the most ridiculous or the most brilliant little creatures I’ve ever seen. Within a month, I had a dedicated breeding colony. Within a year, I’d lost half of them due to a humidity mistake that still stings when I think about it.
Since then, I’ve dialed in their care to the point where my rubber ducky isopod colonies are thriving, producing mancae regularly, and I’ve helped a lot of fellow keepers get their setups right. I’ve also watched the hype around these little guys explode—prices have fluctuated wildly, misinformation is rampant, and too many people jump in without understanding that Cubaris isopods are not nearly as forgiving as your average Porcellio. I want to give you the guide I needed when I started: honest, practical, and grounded in the real-world experience of someone who’s killed a colony and brought it back from the brink.
Quick Facts / Snapshot
| Category | Detail |
|---|---|
| Scientific name | Cubaris sp. “Rubber Ducky” |
| Common name | Rubber ducky isopod |
| Origin | Thailand (exact locale undisclosed by original collectors) |
| Size | Adults reach 1.5–2.0 cm (about 0.6–0.8 inches) |
| Lifespan | Approximately 2–3 years for individuals; colony is perpetual |
| Breeding rate | Slow to moderate; smaller broods than many common isopods |
| Difficulty level | Intermediate; requires stable humidity and patience |
| Social structure | Communal; thrives in established colonies |
| Price range (2026) | $15–$40 per individual for starter groups; $80–$250+ for established colonies |
| Special feature | Distinctive duck-face pattern on the pleon and bright yellow coloration |
If you’ve kept Armadillidium or Porcellio species and found them easy, you might assume rubber duckies are just as simple. Don’t. They’re not impossibly hard, but they punish instability in ways a powder blue never will. I’ll explain exactly what I mean.
Rubber Ducky’s
Rubber Duckys are a medium size isopod species but are not very easy to take care of. Since they are a more difficult species they are not great for bioactive setups and are better as pets.
CARE INFORMATION
They require a high humidity environment and should be watered and fed once a week. They eat yams or any root vegetables and fish food.
(LIVE ARRIVAL GUARANTEED)
What Is a Rubber Ducky Isopod?
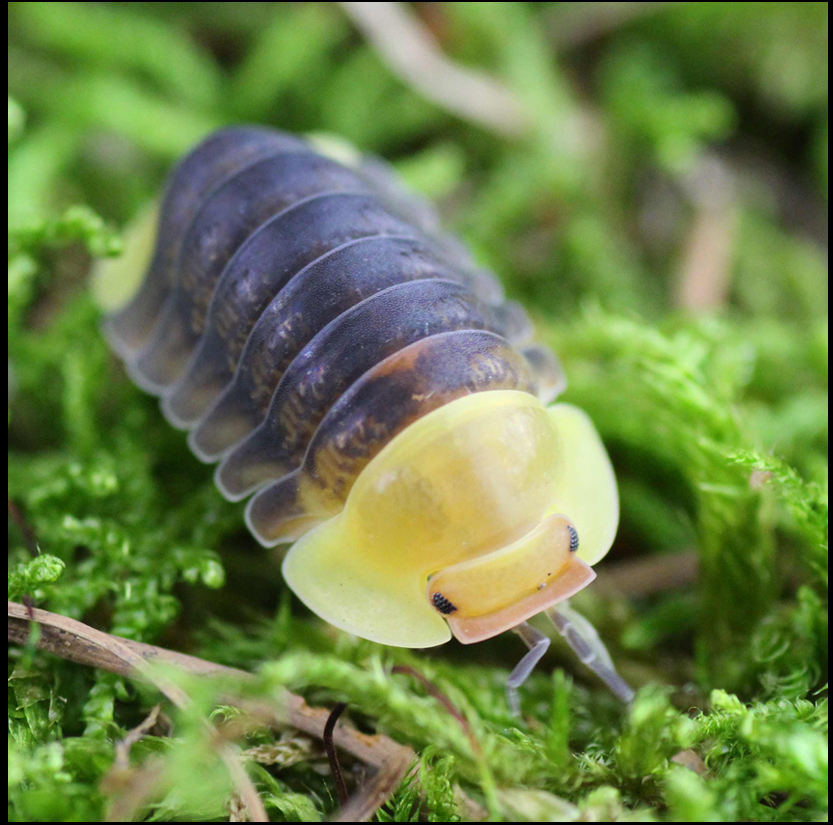
The rubber ducky isopod is a member of the genus Cubaris, a group of tropical isopods that entered the hobby from Southeast Asia. They’re small, conglobating (they can roll into a ball like a pill bug), and absurdly charismatic. The “rubber ducky” name comes from the face-like pattern on their posterior end—a pale yellow or orange background with dark “eyes” and a little rounded “beak” shape formed by the arrangement of the uropods and telson. When they roll up, that face is what you see, and I’ve had visitors to my bug room actually squeal when they spot it.
In the wild, these isopods are found in humid limestone karst environments, where they live among leaf litter, rotting wood, and the moist crevices of rock formations. They’re detritivores, breaking down decaying plant matter and contributing to the nutrient cycle. This is critical to understand: everything about their care revolves around recreating a warm, humid, calcium-rich microhabitat that mimics those forest floor conditions. I’ve found that the more closely I mirror a tropical limestone forest floor, the better my colonies do.
I’ve been culturing Cubaris species for long enough now to know they behave differently than the European and Mediterranean isopods most people start with. They’re slower, more deliberate. They don’t explode in population overnight. They prefer stable, undisturbed setups, and they’re more sensitive to ventilation and moisture fluctuations. If you’re used to dairy cows that breed like crazy and tolerate a dry spell, rubber duckies will humble you.
Understanding Their Popularity and Price
I’ve watched rubber ducky isopod prices come down from absolutely eye-watering levels—when they first hit the US market, a single individual could cost over $100. Even now, they’re a premium isopod. Why?
They breed slowly. A female Cubaris carries a small brood, maybe 10–20 mancae at a time, and the young take a while to reach maturity. There’s no population explosion like you get with Porcellio laevis. This naturally limits supply.
They need stability. I’ve seen entire colonies crash because of a ventilation miscalculation or a heat spike. That risk is baked into the cost. Breeders who’ve invested the time and infrastructure to produce consistent offspring charge accordingly.
The “cute” factor is off the charts. In a hobby where many isopods are various shades of grey and brown, a bright yellow isopod with a duck face is a marketing dream. Social media loves them. That demand props up prices.
One thing I always tell new keepers: don’t buy a rubber ducky isopod as your very first isopod species. I’ve seen too many people drop a few hundred dollars on a starter group, put them in a generic setup, and lose them within weeks. Start with something hardier—Armadillidium maculatum or Porcellio scaber—and graduate to rubber duckies when you’ve got a feel for moisture gradients and ventilation.
Enclosure & Housing Requirements
I’ve set up rubber ducky isopod enclosures in everything from basic plastic shoe boxes to elaborate bioactive vivariums. The principles stay the same, but the execution requires more precision than for most other isopods.
Container Type and Size
I start a small group (6–12 individuals) in a 6-quart plastic bin with a gasket seal. A gasket lid isn’t mandatory, but it gives me control over ventilation. For a thriving colony of 50+, I upgrade to a 15–20 quart bin or a 10-gallon glass terrarium with a partial lid.
The key is that the container must hold humidity while still allowing some airflow. I modify my bins by drilling or melting a few small ventilation holes, but I keep them limited—maybe a row of 4–6 holes along each side near the top. Too much ventilation and the substrate dries out, which is death for rubber duckies. I’ve learned that lesson the hard way.
Substrate Mix
This is where I put the most effort. Rubber ducky isopods need a deep, bioactive substrate that holds moisture, provides nutrition, and supplies calcium. My personal mix, refined over years:
- Organic topsoil (40%) – No fertilizers, no perlite. I bake it at 200°F for an hour to kill pests.
- Flake soil or well-rotted hardwood (25%) – This is fermented wood, often sold for beetle larvae. It’s soft, nutrition-rich, and isopods devour it.
- Crushed cuttlebone and calcium carbonate powder (5%) – Calcium is non-negotiable. Rubber duckies need it for successful molting and reproduction. I grind cuttlebone into a fine powder and mix it throughout the substrate, plus keep a chunk on top.
- Sphagnum moss (10%) – Soaked and squeezed out, mixed into the substrate to create moisture pockets.
- Crushed leaf litter (10%) – Oak, magnolia, or Indian almond leaves, crushed but not powdered.
- Fine orchid bark or coco coir (10%) – For structure and aeration; I use sparingly because coir has no nutritional value.
I aim for a substrate depth of 3–5 inches. Rubber duckies burrow and establish tunnels, especially near moisture gradients. A shallow substrate dries out too quickly and doesn’t support the microfauna that help break down waste.
Moisture Gradient and Humidity
This is where I lost my first colony. I set up a uniformly damp enclosure with no dry zone, and condensation built up inside the lid. The isopods developed a bacterial infection, and within two weeks, most were dead. Never again.
Now I maintain a strong moisture gradient:
- Wet side (about 40% of the enclosure): I pour water directly into the substrate here, keeping it damp but not sodden. Sphagnum moss piled in this zone acts as a moisture reservoir.
- Dry side (30–40% of the enclosure): Just barely moist substrate, with leaf litter on top. This gives isopods a place to retreat if they need less moisture.
- Transition zone (20–30%): Naturally forms between the two.
I mist the enclosure lightly every 2–3 days, focusing on the wet side. I also provide a damp moss hide—a small pile of live or preserved sphagnum that I keep moist. I always see baby rubber duckies congregating there.
Target humidity: I aim for 70–85% relative humidity inside the enclosure, measured with a small digital hygrometer. The substrate should feel like a wrung-out sponge on the wet side and just slightly cool and damp on the dry side.
Temperature
Rubber ducky isopods come from tropical environments, so they prefer warmth. I keep my colonies at 72–78°F year-round. They can tolerate brief dips to the upper 60s, but prolonged cold slows breeding and may cause die-offs. I use a small heat mat on the side of the bin (never underneath, which can overheat the substrate) controlled by a thermostat if my room gets chilly in winter. I’ve found that a steady 75°F is the sweet spot for consistent breeding.
Decor, Hides, and Calcium Sources
I provide:
- Cork bark flats laid directly on the substrate. Rubber duckies love to congregate underneath.
- Whole leaf litter (oak, magnolia, catappa) spread thickly across the surface.
- Cuttlebone chunks and a small piece of natural limestone or eggshell for supplemental calcium.
- A moist sphagnum moss pile on the wet side.
The setup should feel like a slice of forest floor, not a sterile bug bin.
Temperature and Humidity Targets Table
| Parameter | Target Range |
|---|---|
| Ambient temperature | 72–78°F (75°F ideal) |
| Night temperature | Can drop to 68°F; avoid below 65°F |
| Relative humidity | 70–85% |
| Substrate moisture (wet side) | Damp, like a wrung-out sponge |
| Substrate moisture (dry side) | Barely moist, not bone-dry |
| Ventilation | Limited; a few small holes on upper sides |
Diet & Nutrition
Rubber ducky isopods are detritivores with a particular fondness for soft, decomposing organic matter. I feed my colonies a varied diet that mimics what they’d find on the forest floor.
What I Feed Regularly
- Leaf litter (the staple): A constant, thick layer of decaying hardwood leaves. I use oak, magnolia, and Indian almond leaves. They nibble them constantly.
- Rotten wood and flake soil: I bury chunks of well-rotted hardwood and mix flake soil into the substrate. This is a primary food source.
- Vegetables (supplemental): Thin slices of carrot, zucchini, sweet potato, and cucumber offered once or twice a week. I remove uneaten portions after 24 hours to prevent mold.
- Protein sources: Dried shrimp, fish flakes, high-quality dog kibble (crushed, sparingly), or specialized isopod protein mixes. I offer protein once a week. Rubber duckies aren’t as protein-aggressive as Porcellio, but they need it for reproduction and molting.
- Calcium: Cuttlebone always present, plus calcium powder mixed into the substrate and occasionally dusted on vegetables.
- Brewer’s yeast and bee pollen: I sprinkle a tiny pinch occasionally; these are rich in nutrients and seem to stimulate breeding activity.
What I Avoid
- Citrus, onions, garlic, and spicy foods.
- Overly watery vegetables that can spike humidity and cause mold blooms.
- Too much protein—it can lead to grain mite explosions if left uneaten.
- Commercial reptile pellets with high fillers or added minerals not meant for invertebrates.
I’ve found that a steady supply of leaf litter and rotten wood forms the backbone of a healthy diet. Everything else is supplementary. When I’ve tried to replace that with fresh veggies and processed foods, my colonies have done noticeably worse.
Breeding & Reproduction
Breeding rubber ducky isopods requires patience. I’ve heard people call them “the slowest isopod in the hobby,” and while that’s not entirely true, they’re nowhere near as prolific as Porcellio or Armadillidium species. A colony can take a year or more to really hit its stride.
Mating and Gestation
Like all isopods, rubber duckies breed through direct copulation. The female carries fertilized eggs in a brood pouch (marsupium) under her body. Gestation lasts several weeks, during which the female is often more reclusive. I’ve noticed that gravid females spend more time buried or tucked under cork bark on the moist side.
Mancae (Babies)
After gestation, the female releases fully formed miniature isopods called mancae. They’re tiny—about 1–2 mm—and almost translucent at first, gaining their yellow color over several weeks. A brood typically contains 10–20 mancae, though I’ve seen smaller broods from younger females.
The mancae stay hidden in the substrate and moss for the first few weeks. I rarely disturb the setup during this time. The single biggest mistake I made early on was digging around looking for babies to “check on them.” I likely crushed a few and stressed the adults, which slowed reproduction. Now I trust the process and only observe the surface.
Growth Timeline
| Stage | Approximate Age | Size |
|---|---|---|
| Manca (newborn) | 0–2 weeks | 1–2 mm, pale |
| Juvenile | 1–3 months | 3–8 mm, color developing |
| Subadult | 3–6 months | 8–14 mm, sexually immature |
| Adult | 6–9 months+ | 15–20 mm, capable of breeding |
I’ve had colonies where mancae first appeared at around 3–4 months after setup, but others took 6–8 months before I saw any offspring. It depends on the size of the starter group, the ratio of males to females, and environmental stability. Don’t panic if it takes a while. I’ve learned that rubber duckies operate on their own timeline.
Encouraging Breeding
- Keep humidity stable and slightly elevated (75–85%).
- Provide abundant calcium—cuttlebone chunks and calcium-enriched substrate.
- Offer small amounts of high-quality protein weekly.
- Maintain a deep, undisturbed substrate with plenty of cover.
- Keep temperatures steady at 74–77°F.
- Avoid frequent handling or enclosure overhauls.
I also leave the colony largely alone except for feeding and misting. I’ve noticed spikes in mancae production when I’m traveling and not fussing over them. They like benign neglect.
Health, Common Problems & Troubleshooting
I’ve seen a few issues crop up that I wish I’d known about earlier.
Colony Die-Off / Sudden Decline
This is the nightmare scenario. I lost half a colony due to a combination of over-misting and insufficient ventilation, which led to a bacterial bloom and anaerobic conditions in the substrate. The isopods became lethargic, stopped eating, and died in clusters. I fixed it by moving survivors to a fresh setup with better ventilation and a proper moisture gradient. Now I’m meticulous about airflow balance.
Humidity Stress and Failed Molts
Too dry, and isopods fail to molt properly—they get stuck in their exoskeleton and die. Too wet without ventilation, and you risk bacterial or fungal issues. I watch for isopods lingering on the dry side and adjust misting accordingly. A healthy colony moves freely between wet and dry zones.
Mites and Pests
Grain mites and springtails sometimes coexist peacefully, but a mite explosion can stress isopods. I prevent this by removing uneaten protein-rich foods promptly and not overfeeding. Springtails are beneficial; I intentionally seed my enclosures with them to outcompete harmful mites and control mold.
Parasitic Isopod Flies
This is rare but devastating. I’ve never dealt with them personally, but I know keepers who have. Quarantine new arrivals for at least 30 days before introducing them to an established colony. I visually inspect every new rubber ducky isopod under magnification before adding it.
Calcium Deficiency
Soft, deformed shells or die-offs during molting often point to calcium deficiency. I’ve corrected this by increasing calcium availability—more cuttlebone, calcium powder in the substrate, and occasional dusting of food.
Full Cost Breakdown (2026)
Here’s what I’ve actually spent on rubber ducky isopod setups, both starting out and maintaining.
Purchase Price for Isopods
| Source | Cost Range |
|---|---|
| Starter group (6–10 individuals) | $80–$250 |
| Established colony (20–30 individuals) | $200–$500+ |
| Single high-quality adult from reputable breeder | $15–$40 |
Initial Setup Costs
| Item | Cost Range |
|---|---|
| Enclosure (plastic bin, gasket or drilled) | $10–$25 |
| Substrate materials (soil, flake soil, moss, bark, leaves) | $30–$60 |
| Cuttlebone, calcium, and supplements | $10–$20 |
| Cork bark and hides | $10–$25 |
| Heat mat and thermostat (optional) | $30–$60 |
| Digital hygrometer/thermometer | $10–$15 |
| Total initial setup | $100–$205 |
Ongoing Maintenance (Annual)
| Expense | Annual Estimate |
|---|---|
| Replacement substrate and leaf litter | $40–$80 |
| Supplements, calcium, cuttlebone | $15–$25 |
| Protein sources (dried shrimp, fish flakes) | $10–$20 |
| Occasional upgrades (larger bin, new cork) | $20–$40 |
| Total annual cost | $85–$165 |
Rubber ducky isopods are relatively inexpensive to maintain once the initial colony and setup are purchased. The real cost is patience.
Frequently Asked Questions
Q: What is a rubber ducky isopod?
It’s a small, brightly colored Cubaris isopod from Thailand, named for its distinct duck-face pattern. They’re popular in the bioactive and invertebrate hobbies.
Q: How much do rubber ducky isopods cost?
In 2026, expect to pay $15–$40 per individual, or $80–$250+ for a starter group. Established colonies can cost $200–$500+.
Q: Are rubber ducky isopods hard to keep?
They’re intermediate in difficulty. They require stable humidity, a proper moisture gradient, and patience. Not ideal for absolute beginners.
Q: How fast do rubber ducky isopods breed?
Slower than many common isopods. A starter group may take 3–8 months to produce visible mancae, and a colony can take a year or more to become well-established.
Q: What do rubber ducky isopods eat?
Decaying leaf litter, rotten wood, flake soil, supplemented with vegetables, protein, and calcium. Leaf litter is the foundation.
Q: What temperature and humidity do they need?
72–78°F and 70–85% humidity, with a moisture gradient allowing them to choose wet or dry zones.
Q: Can I put rubber ducky isopods in a bioactive reptile enclosure?
It’s possible, but they may not thrive if the enclosure has high ventilation or dry conditions. They do best in dedicated, humid setups where conditions are tightly controlled.
Q: Do rubber ducky isopods need UVB or special lighting?
No. They prefer darkness. I keep mine in ambient room light without any special fixtures.
Q: Why did my rubber ducky isopods die?
The most common causes are humidity problems (too dry or too wet), poor ventilation, temperature extremes, or calcium deficiency. Check your moisture gradient and airflow.
Final Thoughts
Rubber ducky isopods are, quite honestly, one of the most delightful invertebrates I’ve ever worked with. There’s a childlike joy in peeking into their bin and seeing that little yellow face staring back at you. But they’ve also taught me patience in a way few other species have. They don’t reward rushing. They reward observation, stability, and a willingness to let a tiny ecosystem run its course.
If you’re ready to put in the effort, set up a proper enclosure, and wait weeks—maybe months—for the magic to happen, rubber duckies will give you back everything you put into them. They’re not the easiest isopod. They’re not the cheapest. But they might just be the most charming, and for those of us who love them, that’s more than enough.